FileAssurity is started from the
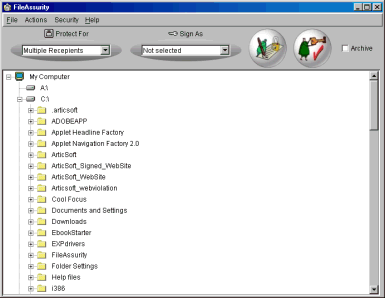
When FileAssurity first loads the FileAssurity tree view window is displayed:
Menu Options
File
Opens the selected files in their default applications. For example, if you have selected a Word document (.doc) it will be opened in Microsoft Word.
Selects all the files in the selected folder.
Renames the selected file or folder.
Arrange Icons
Re-open Secure File
A record of the last 18 secure files you have accessed is displayed here so you can quickly select them.
Re-open Archive
A record of the last 18 secure archives you have accessed are displayed here so you can quickly select them.
Exit
Exits the FileAssurity application.
Actions
Protects and/or signs the selected files/folders in the left-hand pane using the keys selected in the æProtect ForÆ and æSign AsÆ drop-down list boxes.
Sends your files securely via email. See E-mailing Files Securely.
Deletes the selected files/folders so that they are no longer recoverable. See Deleting Files Securely.
Security
Displays the Default Settings dialog where you configure FileAssurity default actions for handling files and folder structures.
Displays the Key Manager dialog where you manage your own and other peoples keys.
Help
Displays the FileAssurity help guide (this manual).
Displays FileAssurity's version number.
Toolbar
Sign As
The key displayed in this list box is the one currently selected for signing files. You can select the appropriate key from the drop-down list box. Only keys belonging to you are displayed in this list box. If 'Not selected' is displayed then files will not be signed.
Protect For
The key displayed in this list box is is the one currently selected for protecting files. You can select the appropriate key from the drop-down list box. Keys belonging to you and other people are displayed in this list box so that you can protect files for yourself or for other people. If you select 'Multiple Recipients' you will be able to make a selection from all the recipients you have available. If 'Not selected' is displayed then files will not be protected.
NOTE: If this is the first time you have used FileAssurity then the value in both of these fields will always be set to æNot selectedÆ. On subsequent uses, the keys you last selected will be displayed.

Secure
Clicking on this button protects and/or signs the files selected in the FileAssurity window using the keys displayed in the 'Sign As' and 'Protect For' list boxes.

Unprotect & Verify
Clicking on this button unprotects and/or verifies the files selected files in the FileAssurity window.
Archive
If this checkbox is checked then the files you have selected for protection and/or signing will automatically be created in an archive file. Rather than each file being protected and saved individually, a single archive file is created that contains all the protected files.